.png?width=870&height=538&name=Templates%20Blog%20(8).png)
If you’re frustrated with your email campaign process thus far and have been looking for a way to improve your email marketing game, you’ve arrived on the right page.
We’ve been doing this for a long time, not only can we recommend our favorite tool backed by real-world experience – but we’ll also be breaking things down into bite-sized pieces for you in a handy, step-by-step guide, removing the hassle. This way, by the end of the article, you’ll be able to create your very own successful campaigns using custom HubSpot email templates.
Let’s take your utilization of the robust HubSpot tools one step further and get you on your way to great email marketing, well-known in this digital age to be quite the critical component in your overall strategy!
Why You Should Be Regularly Utilizing HubSpot Email Templates for Marketing
Creating a likable email is a tough enough feat; we don’t recommend spending the effort and resources trying to take it on manually. Not every company even has an experienced developer on their team who knows the right code at the right level of expertise.
And if yours does, their schedule may not have the capacity to set you up with a fantastic email every time you want to send out a campaign – especially if you’re sending reach-outs to your lists once or twice, daily (yes, some do it that frequently).
Why is it so important to be likable, though, you might ask?
Aren’t emails just a way to quickly and easily get information out about products, services, content, deals, and news to your prospects and customers?
Do people look at them closely?
Do people care about how these marketing pieces look?
Studies show the answer to be a resounding yes. Your emails shouldn’t be getting the least focus out of all your marketing efforts – the details are more important than you may think. The majority of consumers won’t spend more than a few seconds looking at something in their inbox if it doesn’t have a certain appeal.
They want it to look and feel great, and they want to be inspired – what they don’t want is something that feels boring or looks like the company didn’t care to put in the proper effort.
The appeal has to do mainly with design and usability. Luckily, there are many different types of templates available to help you with this task, such as HubSpot email templates.
An email template is an HTML file you’ll use to build your campaigns.
A good template should allow you to copy and paste content right into the email – and it should still render correctly whether the reader is using a desktop computer or mobile device.
It also should be able to handle the various email providers, as we know everyone has their preferences, thus not all your contacts will be using the same one to view what you’ve sent.
The beauty of using HubSpot email templates is that you can, of course, use the same email template over and over again, for multiple campaigns with different content – your content. Don’t worry, thinking this is the cheap or easy way out and that your lists won’t be made to feel special by going this route.
Many templates these days will be highly customizable to fit your needs – if a template provider ever feels too limited, you may be using the wrong tool.
While some marketers may be using platforms that have pre-made templates, and that might work for them, we advise you take just a little extra time to ensure your company’s template is, well, uniquely “you.”
Not only that, but by taking advantage of templates for your email marketing campaigns, you can stay consistent, deliver a personalized experience to the recipient, and save time – requiring no additional work on your end, you can even make it so that your template is consistently updating itself with fresh content for your subscribers!
Now, we don’t have to say we like HubSpot email templates just because we happen to be a proud HubSpot partner. We chose to be a partner in the first place because, in our experience, this has bee one of the best marketing platforms we’ve found to use in our combined decades of experience, thus far. It’s proven time after time to help make the process as fast, simple – yet still incredibly successful and meaningful – as possible.
HubSpot email templates have been an effective tool for us and our clients of all industries, offering all sorts of powerful features.
We haven’t found it necessary to compromise quality whatsoever, but rather, we have been able to deliver personalized experiences for our customers, every time.
It’s now time you do the same for yours, and we can show you to create custom HubSpot email templates.
Step-by-Step Guide to Creating Custom HubSpot Email Templates
Step 1
Gather all the image elements of your HubSpot email templates. Make sure that the dimensions are the same size as what you have in your design. Unlike website pages, email and newsletter templates are displayed and read on email clients.
Although both website pages and email/newsletter templates are created using HTML, they have a big difference in implementation and their coding environment.
Step 2
-
In your HubSpot account, navigate to Content > Design Manager.
-
In the left sidebar, click the File dropdown menu and > New file.
-
In the dialog box, click the What would you like to build today? dropdown menu and select HTML & HubL or the best option that suits you.

Step 3
Enter the details of your new file:
-
-
Choose either Template or Template Partial. A template partial is a reusable template that can be incorporated into other templates.
-
Open the Template type dropdown menu and choose the kind of template you are creating (page, blog post/listing, email, or system page).
-
In the File name field, input a file name.
-
To change the file's location, go to the File location section, click Change, and select a folder.
-
Click Create.
-
Step 4
If you select the HTML option, enter the HTML for your template in the code editor.
-
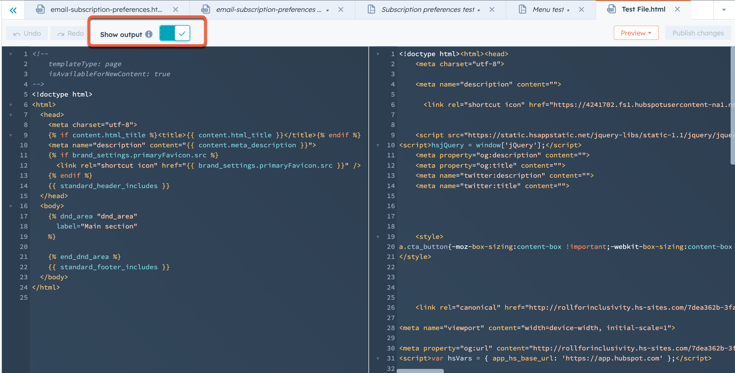
To see how your HubL will appear, toggle the Show output switch. A panel on the right will display the rendered preview.
-
To view how your template looks, go to the Preview dropdown menu in the upper right corner and choose Live preview with display options.
-
Once you have completed your edits, select Publish changes located in the upper right corner.
-
If any code errors occur, an error message will be displayed. Check the error console below the code editor for more details about these errors.

Step 5
If you want to clone a template and not start from scratch. You can also convert drag-and-drop templates for blogs, website pages, and landing pages into HTML.

Step 6
You can also create a new email template using the “Drag and Drop” option (This depends on what type of plan you have in Hubspot).
%202.55.13%20p.%20m..png?width=599&height=514&name=Captura%20de%20pantalla%202025-01-14%20a%20la(s)%202.55.13%20p.%20m..png)
Step 7
In this option you can create default Hubspot blocks, remember that this is for a simpler design that provides versatility and speed.
%202.55.54%20p.%20m..png?width=599&height=451&name=Captura%20de%20pantalla%202025-01-14%20a%20la(s)%202.55.54%20p.%20m..png)
Step 8
Here you can place images, text blocks, HTML code, as well as establish colors and fonts for a template. (Remember that no email supports video, you can only create a CTA element to send to an external link).
%203.59.53%20p.%20m..png?width=599&height=205&name=Captura%20de%20pantalla%202025-01-14%20a%20la(s)%203.59.53%20p.%20m..png)
Step 9
On your template grid, if you need to break a section into columns, right click on a section then click “Split module.” If you need another row, you can always click “Duplicate module.”

And, if you need one column to be wider, locate the divider between the column and drag it to your desired size. Don’t forget to save your HubSpot email templates after you’ve made your adjustments, as you don’t want to lose your work if there were to be a sudden crash.
Step 10
To edit the properties of your email template elements, click on the module on your template grid and click the “Edit” tab on the right-hand sidebar. In the module properties, you can set your text color, background color, and more. You can also add your inline CSS styling. Yes, it has to be inline CSS – most email client readers, whether online or software, require CSS to be embedded.

Step 11
You can review your progress at the top right in the “Preview” button by selecting “Live preview with display options”.
%202.57.24%20p.%20m..png?width=599&height=288&name=Captura%20de%20pantalla%202025-01-14%20a%20la(s)%202.57.24%20p.%20m..png)
Step 11
When you have finished your template, click on the “Publish changes” option.
%202.57.44%20p.%20m..png?width=599&height=74&name=Captura%20de%20pantalla%202025-01-14%20a%20la(s)%202.57.44%20p.%20m..png)
Step 12
To create a new email in the left menu select: Marketing > Email.
%202.58.06%20p.%20m..png?width=560&height=954&name=Captura%20de%20pantalla%202025-01-14%20a%20la(s)%202.58.06%20p.%20m..png)
Step 13
Click at the top right on the “Create email” button.

Step 14
Select the type of email you are going to use, in this case we will use it in the “Regular” option.
%202.58.28%20p.%20m..png?width=605&height=818&name=Captura%20de%20pantalla%202025-01-14%20a%20la(s)%202.58.28%20p.%20m..png)
Step 15
In this section you can select the template for your new email, to see your template in the left menu select the “Other” option.
%202.58.54%20p.%20m..png?width=624&height=306&name=Captura%20de%20pantalla%202025-01-14%20a%20la(s)%202.58.54%20p.%20m..png)
Step 16
Once your template has been selected, you can modify it with more modules (if you selected the Drag and Drop option in the Design Tools, if you selected the HTML option some of the elements may not be available).
%202.59.21%20p.%20m..png?width=624&height=417&name=Captura%20de%20pantalla%202025-01-14%20a%20la(s)%202.59.21%20p.%20m..png)
Step 17
On the left side you have Layout options and models that you can drag to your template.
%202.59.30%20p.%20m..png?width=551&height=1207&name=Captura%20de%20pantalla%202025-01-14%20a%20la(s)%202.59.30%20p.%20m..png)
Step 18
To change the fonts, colors and margins use the “Design” option in the left menu.
%202.59.43%20p.%20m..png?width=624&height=1729&name=Captura%20de%20pantalla%202025-01-14%20a%20la(s)%202.59.43%20p.%20m..png)
Step 19
You can add images and modify your text by clicking on the modules of your email.
%204.21.59%20p.%20m..png?width=624&height=430&name=Captura%20de%20pantalla%202025-01-14%20a%20la(s)%204.21.59%20p.%20m..png)
%204.21.39%20p.%20m..png?width=624&height=421&name=Captura%20de%20pantalla%202025-01-14%20a%20la(s)%204.21.39%20p.%20m..png)
Step 19
To see your email as the client would see it, use the Preview button > Preview as contact
%202.59.50%20p.%20m..png?width=624&height=345&name=Captura%20de%20pantalla%202025-01-14%20a%20la(s)%202.59.50%20p.%20m..png)
Step 20
Here you can view your email and if necessary apply the corrections.
%203.00.01%20p.%20m..png?width=624&height=325&name=Captura%20de%20pantalla%202025-01-14%20a%20la(s)%203.00.01%20p.%20m..png)
Step 21
In the upper “Settings” section you must add basic information before sending the email.
%204.17.51%20p.%20m..png?width=624&height=862&name=Captura%20de%20pantalla%202025-01-14%20a%20la(s)%204.17.51%20p.%20m..png)
Step 20
In the “Send or Schedule” section you will put who the email is addressed to and who it will not be sent to. And you’ll have 2 options. You can Send Now, or you can schedule it to coincide with a marketing campaign.
%203.01.20%20p.%20m..png?width=624&height=377&name=Captura%20de%20pantalla%202025-01-14%20a%20la(s)%203.01.20%20p.%20m..png)
Step 21
Once these steps are done, your email will be ready to be sent, click on “Review and send”. Remember that you can create, clone or import new templates whenever you want by following these steps.
Good Luck!
%203.01.52%20p.%20m..png?width=544&height=270&name=Captura%20de%20pantalla%202025-01-14%20a%20la(s)%203.01.52%20p.%20m..png)
Congratulations – You Now Know How to Create Your Custom HubSpot Email Templates!
We invite you to now take this information and run with it. Experiment and test – see what works best for your company and clients, and what doesn’t. You know how best to customize a template that will suit your brand.
Ideally, you might be looking to set this up as soon as today! It’s an integral part of any truly comprehensive marketing strategy. If you’re still feeling like you could use some assistance though, our helpful consultants are merely a phone call away
Share this
You May Also Like
These Related Stories

How to Create a Professional Email Signature in HubSpot (Step-by-Step)

6 Steps To Launching Effective Ecommerce Facebook Ads
